Showing posts with label appetizer. Show all posts

Friday, December 4, 2015

Recipe: Broccoli Cheddar Soup with Gluten Free Garlic-Herb Croutons


You say hangover, I say broccoli cheddar soup bread bowl. 

Or, I did say.

In college, (pre-Celiac diagnosis), my go-to for nursing a rough but probably well-deserved hangover was a Panera bread bowl filled to the carby brim with broccoli cheddar soup. 


That's right. A bowl of gluten, filled with gluten. I am so, so sorry, body. I just had no idea. 

:(


These days, I still LOVE me some broccoli cheddar soup, with or without the prerequisite hangover. I'd like to think this recipe is a tad healthier than Panera's version, since it only has a cup of cheese and a quarter cup of heavy cream (which really you could leave out if you wanted to). The soup gets a lot of body and richness from cooking and blending the broccoli stalks, which I'm happy to use instead of tossing them!


In place of the bread bowl of days past, I top each bowl of soup with a handful of crispy, garlic-herb croutons made from Against the Grain Gourmet baguettes. Have you guys had these baguettes? They're incredible. I can't even keep them around at my parents' house because my sister (non-Celiac) likes them better than regular bread. Go figure! 


This recipe ROCKS if you have an immersion blender. (I have this one.) You can totally transfer the soup to a blender in batches, but if you make a lot of pureed soups and sauces you should really think about making the switch. There's less cleanup, and honestly it's SO fun to whiz everything up right in the pot. Though beware of splashing. Or your dog will end up with a splash of bright green broccoli cheddar soup on his head.... that you don't find until 4 hours later. MMM LEFTOVERS. 


Recipe: Broccoli Cheddar Soup
[original recipe by Jeff Mauro]

Ingredients
2 stalks of broccoli (about 1.5 pounds)
2 tbsp butter
1 small white or yellow onion, roughly diced
2 tsp dry mustard 
1 tsp salt
1/2 tsp black pepper 
2 to 3 cloves garlic, roughly chopped
1 tbsp red wine vinegar or balsamic vinegar 
4 cups gluten free chicken stock, plus extra if needed (can sub vegetable stock)
2 cups fresh baby spinach 
1 cup extra sharp, grated cheddar cheese
1/4 cup heavy cream

Instructions
Remove the florets (tops) from the broccoli, and separate into individual florets. With a sharp paring knife or vegetable peeler, remove the outer layer of the remaining stalks. Roughly dice. 

In a large, heavy-bottomed pot (like this one), melt the butter over medium heat. Once melted, add the onion, broccoli stalks, dry mustard, salt and pepper. Saute for 5 minutes, stirring occasionally. Add the garlic, and cook for 2 more minutes. 

Deglaze by adding the vinegar and 1 cup of the stock. Use a wooden spoon to scrape any brown bits off the bottom of the pot. Add all of the broccoli florets, and enough additional stock to cover the broccoli. (I added 3 cups, making it 4 cups total.)

Bring the liquid to a boil, then cover with a lid and simmer for 10 minutes until broccoli stalks and florets are tender. (Should be able to easily pierce them with a knife.) 

Remove the soup from the heat. Stir in the spinach. Using an immersion blender, blend until the soup is completely smooth. (If you're using a blender instead, CAREFULLY transfer the soup to the blender, filling only halfway, and blend until smooth. You'll probably need to do this in two batches, then return it to the pot.) If your soup is a bit too thick, add more stock to achieve the desired consistency. 

Stir in the shredded cheese and heavy cream. Serve warm, garnished with gluten free croutons (recipe below). 


Recipe: Gluten Free 
Garlic-Herb Croutons 

Ingredients
1 gluten free baguette (such as Against The Grain), thawed and diced into 1-inch cubes
2 tbsp olive oil
1/4 tsp garlic powder
1/2 tsp Italian seasoning 
Salt and pepper, to taste
2 tsp grated Parmesan cheese
1 tbsp chopped, fresh herbs (e.g. basil, parsley, chives)

Instructions
Preheat oven to 375 degrees.

Add the bread cubes to a large bowl. Drizzle the olive oil around the inside of the bowl, and toss to coat. Sprinkle the garlic powder, Italian seasoning, salt and pepper over the bread, and toss once more. 

Spread the seasoned bread cubes in an even layer on a foil-lined baking sheet. Bake for 15 to 20 minutes until golden and toasted, tossing halfway through. 

Remove croutons from the oven, and immediately sprinkle with Parmesan cheese and fresh herbs. Toss to coat. 

Can be served immediately, or made ahead of time and stored in an air-tight container. 

Tuesday, December 30, 2014

Two 4-Ingredient, No-Cook New Year's Eve Appetizers, Take II

This time last year, I shared two four-ingredient appetizers that are perfect for New Year's Eve. You can find them here, if you'd like. (They're both my mom's recipes so all kudos to that fine woman. My family's been making these for ever and ever.)


This year, I wanted to do the same. I'm a big fan of small bites that are assembly only (i.e. no cooking), and that look pretty all lined up on a platter. Classy appetizers balance out plastic champagne flutes, I figure.... 

They DO NOT balance out losing your phone in your own apartment sometime after midnight. Maybe I'll find it when I move out? 


These two recipes totally fit the bill, and would you look at that? They're each four ingredients. -ish. 


They also both involve cheese, as all good things do. I skipped the crackers since I'm pretty sure you can navigate that one on your own. Plus, these one-biters are naturally gluten free, which takes the guess-work out of finding gluten free crackers that don't taste like cardboard or packing peanuts. (Though put some cheese on that cardboard, and... yep gone.)

How are you guys ringing in 2015? I'll be in a house with a broken oven, so if you have any more no-cook or stove-top recipes please share in the comments! (I'm thinking tacos for dinner - extra guac.) If you'll be somewhere with an oven, these lemon pepper chicken wings are out. of. this. world. I'm already jealous.

Catch ya next year, friends!

Appetizer Recipe 1: Caprese Bites with Balsamic Drizzle 

Note
- Use cherry tomatoes, NOT grape tomatoes. Cherry tomatoes are rounder (as opposed to oblong) so they'll stay upright on the platter, believe it or not. The Kitchn breaks down the difference between the two here.

Ingredients
Cherry tomatoes (see note)
Mozzarella cheese, cubed 
Fresh basil
Balsamic glaze (like this from Trader Joe's)
Salt and pepper, to taste

Instructions
Core the cherry tomatoes by cutting around the stem-end with a paring knife; angle the tip of the knife towards the center of the tomato. Don't cut all the way through to the bottom!

Use a small spoon or the back of a utensil to scrape the seeds and juices out of each cored tomato. (I usually do this right over a garbage can then shake the tomato upside down a few times.)

To assemble each bite, wrap one small basil leaf or half of a large basil leaf around one cube of mozzarella. Stuff the basil-wrapped mozzarella into one of the tomatoes. Repeat with all of the tomatoes, and arrange on a platter. 

Sprinkle salt and pepper over the assembled caprese bites. Drizzle with the balsamic glaze right before serving. 


Appetizer Recipe 2: Brie-Apple Bites with Pecans and Honey


Ingredients
Granny smith apples, sliced and tossed with lemon juice or apple juice to prevent browning
Brie cheese, sliced 
Pecans, roughly chopped and toasted 
Honey 

Instructions
To assemble, top each apple slice with a piece of brie, and a few toasted pecan pieces. Arrange on a platter, and drizzle with honey. (Try running your honey bottle under warm water or resting in a bowl of warm water so it pours easier.)

Possible Substitutions
- Instead of apple: sturdy pear slices
- Instead of brie: goat cheese, blue cheese, sharp cheddar
- Instead of pecans: walnuts, almonds, pistachios
- Instead of honey: warmed jam (maybe raspberry), balsamic glaze 
- Add prosciutto
- BASICALLY DO WHATEVER THE HECK YOU WANT. :) :) :)

Monday, September 29, 2014

Recipe + Giveaway: Gluten Free Corn Dog Nuggets from Silvana's Gluten-Free and Dairy-Free Kitchen

Hoooooooooooly crap you guys I fried something. 

And not just anything. The cutest littlest babiest gluten free corn dog nuggets.

See?? Did you squeal a little? I just wanna pinch one right through my screen. 

Truth be told I have never fried a morsel in my life - the thought of dropping anything into a vat of hot oil freaks me out. (Plus, I am an absolute oil-magnet. Oil-stains are the new tie-dye! Yeah!) So when Silvana asked me to check out her new cookbook, I musta been feeling ballsy cause I chose the most intimidating recipe (to me). Also a factor: I haven't had a corn dog since being diagnosed with Celiac 5ish years ago, and LORD do I miss me some Nathan's nuggs. (Preferably eaten in a mall food court. Am I right?)


I've gotta tell you - these guys were so simple to make, and Silvana's instructions are incredibly clear, especially for a frying newbie. The batter (a mix of cornmeal and a gluten free flour blend) is so thick and dreamy that you'll want to dunk your whole damn hand in it.

Once battered, the mini corn dogs fry up in two minutes (two minutes!!!) and it is quite literally one of the coolest things I have ever seen happen in my own kitchen. They puff up. And turn a lovely golden color. And LOOK JUST LIKE CORN DOGS WOULD YOU BELIEVE IT. Innnnnncredible. 


Want the recipe? I just might have it for you after the jump :) Click through at the end of this post and it's all yours.

But if you can't stop at corn dogs, I understand. Silvana's book also has recipes for cinnamon crunch french toast sticks, salted soft pretzel poppers, loaded nacho potato skins and ranch chicken nuggets. I won't even tell you the desserts because then you'll be dead. And I kinda like you. I like you SO VERY MUCH that I'd love for you to have a copy of Silvana's Gluten-Free and Dairy-Free Kitchen. (I mean Silvana is technically the one giving away the book but details details.)

a Rafflecopter giveaway
'Read more' for that corn dog recipe...

Thursday, March 27, 2014

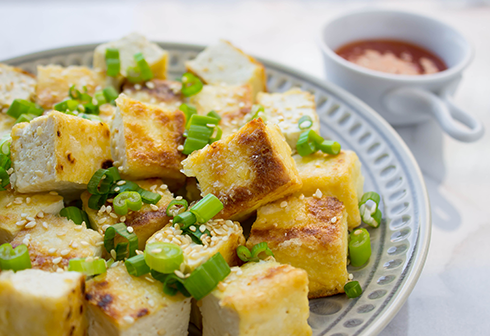
How to Make Crispy Pan-Fried Tofu like a CHAMP

Hold the chips. I'll have this, please:


SO WHAT if I snack on crispy, pillowy little tofu cubes. So freaking what if I'm obsessed with the crunchy outside, and soft, silky inside. (Especially when dunked in sweet thai chili sauce, or with a few drops of my new favorite gluten free soy sauce. Hubba Hubba.)


To be fair, these little guys also make their way into vegetable stir fry quite often. (Exhibit A, of many Exhibits.)


My tofu-searing was pretty hit-or-miss for a while, until I read this article on The Kitchn that recommended coating the tofu with cornstarch. AAHH of course there's a secret! And let me tell you, it's pretty foolproof. As long as your pan is hot and you've got a little oil action going on, there will. be. crust. 


Only thing is, I'd kinda rather not flip 24 individual tofu cubes in a screaming hot pan. Instead, I cut the whole block in half, pan-fry each half of the tofu block (which is just TWO pieces to flip - go math), then slice it into cubes. No, all 8 sides of each tofu cube are not crispy. But I never miss it. Besides, I'm usually inhaling them too fast for my mouth to notice.


Really hoping you give this method a shot. If you don't already enjoy tofu, maybe it will even make you a convert? Hey, I'm not trying to sell miracles here. Just some crispaaaaay tofu nuggets. You oughta know.


Recipe: Crispy Pan-Fried Tofu Cubes 
(with Scallions and Sesame Seeds)

Notes
- Instead of cutting the tofu into cubes, you can leave each slab whole and serve it as a main protein. Or, try slicing each slab into strips (like tofu fries)!
- The crispy cubes can be eaten alone (I think they'd make a great appetizer with a cool dipping sauce), or tossed into stir fries, salads, etc. 
- I think a really sharp, serrated knife is important for slicing the crispy tofu without damaging the crust. (I've been using this one for years and it's still SO sharp. Also works magic on tomatoes!)

Ingredients
1 16-oz. block firm tofu
Cornstarch
Canola oil 
Sliced scallions (optional)
Toasted sesame seeds (optional)
Gluten free dipping sauce, like S&F Sweet Thai Chili Sauce (optional)

Instructions
Slice open tofu container and drain out all of the liquid. Pat the block of tofu dry with a paper towel.

Rest the tofu on one of the shorter sides, and slice down the middle with a serrated knife to cut it into two equal slabs. (Slabs? Sure, we'll run with that. See pictures for reference.)

To press some of the liquid out of the tofu, stack three folded-in-half paper towels on a cutting board. Place the two tofu slabs on top, and cover the tofu with three more folded-in-half paper towels. Place a heavy skillet (cast iron, if you have it) and a few cans/jars on top of everything to weigh it down. Leave the tofu to drain for at least 5 minutes. 

Discard the paper towels (which should have soaked up a good amount of liquid). Dust the two largest surfaces of each tofu slab with cornstarch, spreading it out and pressing it in with your fingers. You can optionally coat the sides as well if you want to crisp those too.

Place a large, non-stick skillet over medium-high heat and add enough canola oil to lightly coat the bottom. (I used about 1.5 teaspoons.) Once the oil is really hot, place the two pieces of tofu in the pan, cut side down. 

Cook for 7 minutes (or until the bottom is very golden and has formed a crust). Flip the tofu, and cook for an additional 7 minutes. (You may need to add another splash of oil after you flip.)

At this point, if you cornstarch-ed the sides of the tofu, you can use tongs to sear all 4 of the sides for 1-2 minutes each. (Sometimes I skip this step.) 

Move the tofu to a cutting board and allow it to cool for a few minutes. Use a serrated knife and a gentle sawing motion to slice each slab of tofu into 12 cubes - cutting lengthwise into thirds, then crosswise into fourths (see photos). You'll want to use a really sharp knife, and be gentle so that the crust doesn't tear off.

Now your crispy tofu cubes are ready to be added to stir fries, salads, or eaten alone! If eating them alone, I top them with a handful of sliced scallions and a few big pinches of toasted sesame seeds. They're extra delicious dunked in a sauce like this one.

Tuesday, January 21, 2014

Recipe: Baked 3-Ingredient Lemon Pepper Wings

New working blog name: Food My Mom Makes and So I Make It Too.


Ugh it's too long for a Twitter handle. Back to Gluten Free Blondie. 

As you can guess, this is another one of my mom's WORLD FAMOUS recipes. (I say 'world' because I'm positive if the whole entire world knew about these wings they'd be making them too.)

Just like the rosemary marcona almonds, these are another appetizer where if you serve them, people will be all 'Wtf is on these give me the recipe immediately'. And you will give them the recipe, which is a total of three ingredients, and they will be like 'No dude, I'm serious. Give me it.'


But that's really it. Chicken, lemon pepper, and a can of canola oil to make it stick. Something incredibly magical happens when you crust some little wings and drumsticks with lemon pepper seasoning. The chicken meat stays so moist (like fall off their teeny tiny bones moist), and the skin. Oh dear god the skin. It's crispy and crackly and spicy and lemony and everything chicken wing skin should be. 

You can make these for the Super Bowl in a few weekends, and they'll be the first thing to go. Or you can make them for dinner tomorrow night and eat them all yourself. (I plan on doing both!)


PS. This post was almost, almost just a link to the chicken wang song. Bless the soul who created a video that is a seamless 10 hours of pure joy.


Recipe: Baked 3-Ingredient Lemon Pepper Wings

Note
-If your chicken isn't separated into wings and drumsticks already, you can separate them yourself! The image above shows where to cut the chicken. Use a large, sharp knife and push it down right in between the joints. (Ew, I know. Worth it, though.)

Ingredients
Chicken wings (combo of wings and drumsticks)
Cooking spray
Lemon pepper 
Fresh parsley, cilantro or basil, chopped (optional)

Instructions
Preheat oven to 425 degrees. 

Line a baking sheet with foil.  Coat lightly with cooking spray. Arrange the chicken on the baking sheet, skin side up. Coat all of the chicken pieces with cooking spray, then sprinkle liberally with the lemon pepper. (You can't really use too much, so don't be shy.)

Use tongs to flip each piece of chicken. Coat this side with cooking spray, then sprinkle liberally with lemon pepper.

Place the baking sheet in the oven, and cook for 20 minutes. Use tongs to flip each piece of chicken so they are now skin side up. If you notice that some of the lemon pepper stuck to the foil, sprinkle on some more. Cook for an additional 25 minutes, until the skin is really crisp and nicely browned. 

Serve hot, warm or room temp, and garnish with a sprinkling of fresh parsley (optional). 

Tuesday, December 31, 2013

Two 4-Ingredient, No-Cook New Year's Eve Appetizers (That I Stole From My Mom)

Disclaimer: These recipes are blatantly plagiarized from my mother's brain. And probably also a 1986 issue of Bon Appetit.


These two apps are pretty much a staple at any party my parents host. And every time my mom's all, 'but don't you think people are sick of the endive?'. NO, mom. Give the people want they want. What they want is rosemary almonds and endive boats with smoked salmon.

So tonight, if you're having a party or going to a party or swearing off parties, here are two appetizers that require a total of zero cooking and seem kind of fancy schmancy. Definitely fancy schmancy enough for New Year's Eve. Also! They're each only 4 ingredients. And I'm counting olive oil and salt/pepper, which I think doesn't even qualify as ingredients if we're playing by the rules.

Appetizer Recipe 1: Endive with Smoked Salmon and Boursin Cheese 


Ingredients
Endive (1 endive will get you about 12 good-sized leaves)
Boursin cheese, room temperature (any flavor; I used garlic & herb)
Smoked salmon
Freshly ground black pepper

Instructions
Cut about 1/2 inch off the bottom of an endive spear. Start pulling off individual leaves. As you uncover leaves that are still attached at the base, cut another 1/2 inch off the bottom. Continue separating the endive leaves until you get to leaves that are too small.

Arrange the endive on a platter. Spread each leaf with about 1 teaspoon of the Boursin cheese. Top with a sliver of smoked salmon, twisting a bit so it looks pretty. Sprinkle all of the salmon and cheese topped endive with freshly ground, coarse black pepper. 

Refrigerate until serving. 


Appetizer Recipe 2: Marcona Almonds with Rosemary and Salt 


Ingredients
Marcona almonds, toasted (I get a pre-toasted jar at Costco since they can get pretty pricey elsewhere)
Fruity olive oil
Few sprigs of rosemary, removed from stem and chopped (can sub a few pinches of dried rosemary)
Coarse salt

Instructions
Place the almonds in a large ziplock bag or a bowl. Add the olive oil, rosemary and coarse salt. Shake or stir to evenly coat the almonds. (If the rosemary and salt aren't sticking to the almonds, you need more olive oil. The almonds should be nice and glossy.)

Taste the seasoned almonds, and add more oil, rosemary, and/or salt as needed. 

Store in a ziplock bag or airtight container until serving. 

Sunday, November 24, 2013

Recipe: Shaved Brussels Sprouts Salad with Apples, Walnuts and Pecorino


Salads. Meeeeeehhhhhhhhhh. 

Don't love 'em, but don't really hate 'em either. (Okay sometimes I hate them. I'm pretty sure every Celiac has had this reaction at least once. Or this one. If you haven't freaked the eff out over a salad yet, juuust wait. Your day will come.)

I totally order salads, sometimes. In fact, I'm an absolute whiz at plucking out all of the toppings and leaving the dumb lettuce behind. If there's cheese or some kind of porky-meat in that pile of leaves I will FIND IT. I am the Liam Neeson of salads. And mix-ins are my rebellious teenage children.


So what in the heck is a salad recipe doing on this blog? Well for starters, you won't find any lettuce. This salad is ALL sprouts. Which just so happen to be my favorite veggie in all the land. 

There's also a big ol' pile of cheese, which, yum. 

If you haven't signed off on your Thanksgiving menu yet, this would make a mighty fine addition. Or maybe make it the day after when you're good and stuffed? It's really quite light and refreshing (thanks diced apples!), so I think you'll enjoy it either way. 


Recipe: Shaved Brussels Sprouts Salad with Apples, Walnuts and Pecorino
[inspired by this salad from Sylvain in New Orleans, LA]

Notes
-If you want to make this extra festive you could throw in a handful of dried cranberries or dried cherries. I thought about it, but what I love most about this salad is its simplicity. Your call!
-Another solid addition would be crispy prosciutto or... bacon.

Ingredients
Agave White Balsamic Dressing:
1/2 cup olive oil
1/4 cup white balsamic vinegar (can sub white wine vinegar or champagne vinegar)
2 tsp agave (can sub honey)
1 tsp dijon mustard 
1/2 tsp salt
1/2 tsp pepper 

Sprouts Salad:
3 cups raw, shaved Brussels sprouts (one 10 oz. Trader Joe's bag)
3/4 cups toasted, chopped walnuts (can sub almonds or hazelnuts)
2 granny smith apples, peeled and diced 
Fresh-grated Pecorino Romano cheese (can sub Parmesan)

Instructions
Combine all salad dressing ingredients in a jar with a tight-fitting lid. Secure lid, and shake until the dressing is emulsified (thicker and creamier). 

In a large bowl, toss together the sprouts, walnuts, and diced apple. Add about half of the dressing and toss to combine. Add more dressing as needed. (I end up using about 2/3 of the dressing.)

To serve, portion the dressed salad onto plates. Top each plate of salad with a generous pile of grated Pecorino Romano. 

Tuesday, November 20, 2012

Recipe: Pear Slices topped with Crispy Pancetta, Goat Cheese + Honey

At the risk of ruining a certain handsome boy’s street cred, I will not tell you that he scoured my Pinterest boards and surprised me by making this very appetizer, followed by apricot glazed chicken. That would have been totally thoughtful and gushy and delicious and therefore, not cool.

Instead, I will tell you that I’ve been running around like a damn pear-scavenger trying to get this recipe up before Thanksgiving. Because it is peeerrrrfect. We ate it a second time for Friendsgiving this past week, and will definitely be going for round 3 this Thursday. You should too.

But definitely, definitely get someone else (i.e. your loving caring boyfriend, your mom, your cat, etc.) to make it for you. Preferably while you sprawl on the couch in a uniform of 2-day old sweats and exert all the willpower you can possibly muster not to go peek into the kitchen. NOT. EVEN. A PEEK. Cause things just taste better that way, don’t they? Yup.


Recipe: Pear Slices topped with Crispy Pancetta, Goat Cheese + Honey
 [original recipe from My Recipes / Southern Living
Notes
-It’s super important that you do not use over-ripe pears. You should be able to pick up each slice without them bending too much.
-I’ve also made this with prosciutto, so feel free to substitute! Just cut each slice into about thirds before baking.
-Thinking that blue cheese would be a fantastic substitute for the goat cheese.. who wants to be a guinea pig?

Ingredients (makes ~12 portions)
3 ounces thinly sliced pancetta (about 12-14 slices)
2 to 3 firm pears (you should get about 5-8 decent sized slices out of each pear)
½ lemon
2 ounces goat cheese, crumbled
Honey, to taste
Black pepper, to taste

Instructions
Preheat oven to 450 degrees. Line a large baking sheet with foil and spray lightly with cooking spray. Separate the pancetta slices and place them on the baking sheet. They’ll shrink up quite a bit as they cook, so no need to leave much room in between. Bake for 8-10 minutes until the pancetta is darker in color and the edges are curled. Using a spatula, move crisped slices to a paper towel to cool for 10 minutes.

Cut the skinniest part off of one of the pears. Slice the rest of the fruit in rounds about ¼ inch thick. The middle-most slices will have seeds in them. Use a knife or the edge of a spoon to cut out the seeds/core. Move the pear slices to a bowl and squeeze the lemon over them. Toss to coat (this will stop the browning process). Continue with the other pears.

Arrange the pear slices on a serving platter. Top each pear slice with one piece of pancetta then a few crumbles of goat cheese. Drizzle with honey, and finish with a dash of black pepper.

Serve immediately. (If you let them sit out for a while the pancetta won’t be as crispy. But they’ll still be delicious.)

Friday, May 18, 2012

Recipe: Crispy Smashed Fingerling Potato Bites with Taco-Seasoned Cream and Scallions

Alright kids. I’m back... again. With announcements! And confessions! And purple potatoes!

First order of business – I miss you. And I miss blogging and rambling about the radness of whipped egg whites and the uncanny similarities between squash and pasta. It’s not that I haven’t been cooking – I have – this whole perfectionist thing just seems to get in the way sometimes. Perfectionist, as in, I habitually tear pages out of my work notebook and start from scratch if my cursive or a check box isn’t absolutely flawless. And who sees my work notebook? Um, me. That’s it.

So. From now on if I forget to measure, or if I forget to take a picture of the ingredients beforehand, you’re still getting the recipe. (As long as it tastes utterly divine, of course. No compromise there.) Moreover, I rarely measure when I’m cooking myself, so there’s no reason why you can’t use your intuition either. Taste as you go! Eyeball it! You’ll be just fine. I promise.

(There will be some measurements moving forward, of course – mostly because my measuring cups are too darn shiny and cute to neglect.)

Next up – some of you may have arrived here from a Tumblr called When I Went Gluten Free. If that’s you, welcome! If it’s not, you should check it out for some serious giggles. The Kitchn even did a sweet little write-up on it. So I mean, I’ve pretty much plateaued in terms of Internet fame.

And finally - I've been toying with the idea of posting more than just recipes on here. What do you guys want to see: Product recs? Products I wouldn't recommend? Restaurant suggestions? Weekend photo recaps? Pictures of puppies? Please let me know in the comments, or puppies it is. You can consider it your good deed for the day.

WHEW. Now without further ado, here’s a recipe for a bite-sized appetizer that is extra pretty if you can find tri-color, baby fingerling potatoes. It’s like a baked potato bar, except classier. Because tiny = classy, right? Right.

Notes
-This can be easily sized up or down, so that’s why you’ll see proportions as opposed to measurements. (Also, I forgot to measure.)
-Potatoes can be boiled the day before, and the topping can be prepared the day before. Pan-fry and garnish potatoes the day of.
-Extra sour cream/cream cheese mixture makes a great dip for tortilla chips!

Ingredients
Baby fingerling potatoes (preferably purple, red and white; I used ~2 lbs)
Sour cream (fat free or reduced fat)
Cream cheese (reduced fat)
1 packet taco seasoning
Scallions, sliced
Butter (salted or unsalted)
Olive oil
Sea salt (optional, for garnish)

Recipe
-Wash potatoes. Place in a large pot and cover with water. Salt water like you would for pasta. Place over high heat.
-Once water is boiling, cook for 10-15 minutes, or until potatoes can be pierced with a fork. (Cooking time will vary based on the size of your potatoes - don’t let them go completely to mush!)
-Drain potatoes and return to pot; set aside to dry and cool.
-In a small bowl, mix together equal parts sour cream and cream cheese with an electric beater or a whisk. Add more sour cream to thin out, or cream cheese to thicken. Once desired consistency is reached, add taco seasoning to taste.
-Scoop seasoned mixture into a zip-lock bag and cut off a corner so there’s a hole about the width of your pinky. Set aside.
-Spread out cooked potatoes on a cutting board. Using a fork, smash each potato twice – the tongs should make the shape of an X or a cross. You want the skin to break a bit, and for each potato to flatten to about a half inch thick.
-Place a heavy bottomed skillet (preferably cast iron) over medium-high heat. Melt about a tablespoon of butter with a tablespoon of olive oil. Place some of the potatoes in an even layer in the pan, and cook each side for ~2 minutes until crispy and slightly browned. Move to a paper towel to drain, and sprinkle with salt and pepper. Repeat with remaining potatoes.
-Transfer crisped potatoes to serving platter and top each with a dollop of the seasoned cream cheese and sour cream mixture.
-Garnish with sea salt, taco seasoning, and a generous shower of scallions. 
Related Posts Plugin for WordPress, Blogger...